
Got a cool form built with Elementor Pro but not sure what to do with the data? Let’s make your life easier — you can send form submissions directly to Google Sheets, automatically and efficiently!
Let’s say you’re using your form to:
Collect customer data 💌
Register participants for a giveaway 🎁
Capture leads from Meta or Google Ads 📈
Or manage event RSVPs 🎉
Manually copying all that info from Elementor? Ugh… sounds like a nightmare. That’s why syncing your form with Google Sheets is such a lifesaver. Every time someone submits the form, the data goes straight into your spreadsheet — organized and ready for action!
This integration is a secret weapon for anyone who wants to streamline their workflow. Especially if you’re a solo entrepreneur or a small team, automation like this can save hours of your time every week. No need to install extra plugins. No hidden costs. Just a clean, powerful solution using tools you already have.
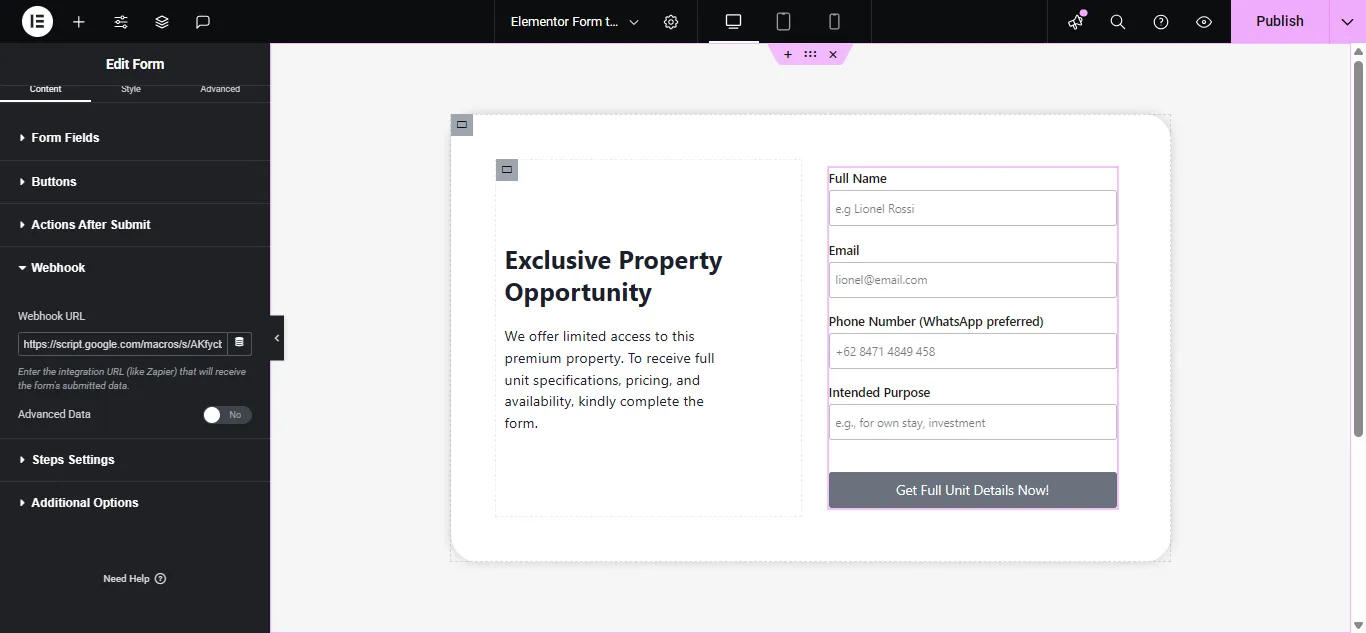
Go to the page where you want to place the form. Use the Form Widget from Elementor Pro and add the fields you need (e.g., Name, Email, Message). Don’t forget to enable "Webhook" under Actions After Submit — we’ll add the URL later!

Open Google Sheets
Create a new spreadsheet and give it a name

In your Google Sheet, go to Extensions > Apps Script
Delete the default code, then paste this script:
/**
 * Google app-script to utilise Elementor Pro From webhook.
 *
 * In order to enable this script, follow these steps:
 *
 * From your Google Sheet, from the "Exstensions" menu select "App Script"…
 * Paste the script from this gist into the script code editor and hit Save.
 * From the "Deploy" menu, select Deploy as web app…
 * Choose to execute the app as yourself, and allow Anyone, even anonymous to execute the script. (Note: depending on your Google Apps instance, this option may not be available. You will need to contact your Google Apps administrator, or else use a Gmail account.)
 * Now click Deploy. You may be asked to review permissions now.
 * The URL that you get will be the webhook that you can use in your elementor form, You can test this webhook in your browser first by pasting it.
 * It will say "Yepp this is the webhook URL, request received".
 * Last all you have to do is set up and Elementor Pro Form with a form name and Webhook action pointing to the URL from above.
 *
 * Update: 09/06/2022
 *  - Name the sheet: you can now add a field (could be hidden) to your form labeled "e_gs_SheetName" and set the defualt value to the name of the sheet you want to use.
 *  - Set the Order: you can now add a form field (hidden) labeled "e_gs_order" and set its defualt value to the names of the columns you want to seperated by comma in the order you want, any other colum not in that list will be added after.
 *  - Exclude Columns: you can now add a field (could be hidden) labeled "e_gs_exclude" and set its value to the names of the columns you want to exclude seperated by comma.
 */

// Change to true to enable email notifications
let emailNotification = false;
let emailAddress = "Change_to_your_Email";


// DO NOT EDIT THESE NEXT PARAMS
let isNewSheet = false;
let postedData = [];
const EXCLUDE_PROPERTY = 'e_gs_exclude';
const ORDER_PROPERTY = 'e_gs_order';
const SHEET_NAME_PROPERTY = 'e_gs_SheetName';

/**
 * this is a function that fires when the webapp receives a GET request
 * Not used but required.
 */
function doGet( e ) {
    return HtmlService.createHtmlOutput( "Yepp this is the webhook URL, request received" );
}

// Webhook Receiver - triggered with form webhook to published App URL.
function doPost( e ) {
    let params = JSON.stringify( e.parameter );
    params = JSON.parse( params );
  postedData = params;
    insertToSheet( params );

    // HTTP Response
    return HtmlService.createHtmlOutput( "post request received" );
}

/**
 * flattenObject
 * Flattens a nested object for easier use with a spreadsheet
 * @param ob
 * @returns {{}}
 */
const flattenObject = ( ob ) => {
    let toReturn = {};
    for ( let i in ob ) {
        if ( ! ob.hasOwnProperty( i ) ) {
            continue;
        }

        if ( ( typeof ob[ i ] ) !== 'object' ) {
            toReturn[ i ] = ob[ i ];
            continue;
        }

        let flatObject = flattenObject( ob[ i ] );
        for ( let x in flatObject ) {
            if ( ! flatObject.hasOwnProperty( x ) ) {
                continue;
            }
            toReturn[ i + '.' + x ] = flatObject[ x ];
        }
    }
    return toReturn;
}

/**
 * getHeaders
 * normalize headers
 * @param formSheet
 * @param keys
 * @returns {*[]}
 */
const getHeaders = ( formSheet, keys ) => {
    let headers = [];

    // retrieve existing headers
    if ( ! isNewSheet ) {
        headers = formSheet.getRange( 1, 1, 1, formSheet.getLastColumn() ).getValues()[0];
    }
  const newHeaders = keys.filter( h => ! headers.includes( h ) );
  headers = [ ...headers, ...newHeaders ];
  // maybe set order
    headers = getColumnsOrder( headers );
  // maybe exclude headers
    headers = excludeColumns( headers );
  // filter out control columns
  headers = headers.filter( header => ! [ EXCLUDE_PROPERTY, ORDER_PROPERTY, SHEET_NAME_PROPERTY ].includes( header ) );
  return headers;
};

/**
 * getValues
 * normalize values
 * @param headers
 * @param flat
 * @returns {*[]}
 */
const getValues = ( headers, flat ) => {
    const values = [];
    // push values based on headers
    headers.forEach( ( h ) => values.push( flat[ h ] ) );
    return values;
}

/**
 * insertRowData
 * inserts values to a given sheet at a given row
 * @param sheet
 * @param row
 * @param values
 * @param bold
 */
const insertRowData = ( sheet, row, values, bold = false ) => {
    const currentRow = sheet.getRange( row, 1, 1, values.length );
    currentRow.setValues( [ values ] )
        .setFontWeight( bold ? "bold" : "normal" )
        .setHorizontalAlignment( "center" );
}

/**
 * setHeaders
 * Insert headers
 * @param sheet
 * @param values
 */
const setHeaders = ( sheet, values ) => insertRowData( sheet, 1, values, true );

/**
 * setValues
 * Insert Data into Sheet
 * @param sheet
 * @param values
 */
const setValues = ( sheet, values ) => {
    const lastRow = Math.max( sheet.getLastRow(), 1 );
    sheet.insertRowAfter( lastRow );
    insertRowData( sheet, lastRow + 1, values );
}

/**
 * getFormSheet
 * Find or create sheet for form
 * @param sheetName
 * @returns Sheet
 */
const getFormSheet = ( sheetName ) => {
    const activeSheet = SpreadsheetApp.getActiveSpreadsheet();

    // create sheet if needed
    if ( activeSheet.getSheetByName( sheetName ) == null ) {
        const formSheet = activeSheet.insertSheet();
        formSheet.setName( sheetName );
        isNewSheet = true;
    }
    return activeSheet.getSheetByName( sheetName );
}

/**
 * insertToSheet
 * magic function where it all happens
 * @param data
 */
const insertToSheet = ( data ) => {
    const flat = flattenObject( data ),
        keys = Object.keys( flat ),
        formSheet = getFormSheet( getSheetName( data ) ),
        headers = getHeaders( formSheet, keys ),
        values = getValues( headers, flat );

    setHeaders( formSheet, headers );
    setValues( formSheet, values );

    if ( emailNotification ) {
        sendNotification( data, getSheetURL() );
    }
}

/**
 * getSheetName
 * get sheet name based on form field named "e_gs_SheetName" if exists or used form name
 * @param data
 * @returns string
 */
const getSheetName = ( data ) => data[SHEET_NAME_PROPERTY] || data["form_name"];

/**
 * getSheetURL
 * get sheet url as string
 * @returns string
 */
const getSheetURL = () => SpreadsheetApp.getActiveSpreadsheet().getActiveSheet().getUrl();

/**
 * stringToArray
 * split and trim comma seperated string to array
 * @param str
 * @returns {*}
 */
const stringToArray = ( str ) => str.split( "," ).map( el => el.trim() );

/**
 * getColumnsOrder
 * used to set the columns order, set this by adding a form field (hidden) named "e_gs_order"
 * and set its value to the names of the columns you want to seperated by comma in the order you want,
 * any other colum not in that field will be added after
 * @param data
 * @param headers
 * @returns {*}
 */
const getColumnsOrder = ( headers ) => {
    if ( ! postedData[ORDER_PROPERTY] ) {
        return headers;
    }
    let sortingArr = stringToArray( postedData[ORDER_PROPERTY] );
  // filter out non existing headers
  sortingArr = sortingArr.filter( h => headers.includes( h ) );
  // filterout sorted headers
  headers = headers.filter( h => ! sortingArr.includes( h ) );

  return [ ...sortingArr, ...headers ];
}
/**
 * excludeColumns
 * used to exclude columns, set this by adding a form field (hidden) named "e_gs_exclude"
 * and set its value to the names of the columns you want to exclude seperated by comma
 * @param data
 * @param headers
 * @returns {*}
 */
const excludeColumns = ( headers ) => {
    if ( ! postedData[EXCLUDE_PROPERTY] ) {
        return headers;
    }
    const columnsToExclude = stringToArray( postedData[EXCLUDE_PROPERTY] );
    return headers.filter( header => ! columnsToExclude.includes( header ) );
}

/**
 * sendNotification
 * send email notification if enabled
 * @param data
 * @param url
 */
const sendNotification = ( data, url ) => {
    MailApp.sendEmail(
        emailAddress,
        "A new Elementor Pro Forms submission has been inserted to your sheet", // mail subject
        `A new submission has been received via ${data['form_name']} form and inserted into your Google sheet at: ${url}`, //mail body
        {
            name: 'Automatic Emailer Script'
        }
    );
};
Source code from https://gist.github.com/inocampo/c7f495c7601ea22ba5fa565f96f17fa8
Click Deploy > New deployment
Choose Web App
Fill in the settings:
Description: (e.g., “Elementor Webhook Integration”)
Execute as: Me
Who has access: Anyone
Click Deploy
After you click Deploy, a pop-up window will appear asking for authorization. Here’s how to handle it step-by-step:
A window will appear saying:
“Authorization required” — click Authorize access.
You’ll be redirected to a Google login screen — choose the same Google account you used for creating the script.
Google will warn you:
“Google hasn’t verified this app”
Don’t worry — this is normal for personal scripts.
Click on Advanced (bottom left corner of the warning message).
Then click Go to [your script name] (unsafe).
Scroll down and click Allow to give the necessary permissions.
Once authorized, you’ll be taken back to the script editor, and your Web App will be fully deployed.
✅ Copy the Web App URL shown — you’ll need this for Elementor’s webhook.


Back in Elementor:
Go to your form settings
Under Actions After Submit, make sure Webhook is selected
A new Webhook tab will appear — paste the Web App URL into the field
Save and publish your page. That’s it!
Now every time someone submits the form, their info will instantly appear in your Google Sheet — clean and organized. No more manual exporting. No more headaches.